Unlocking Restaurant-Quality Oven Ribs: No Smoker, No Sky-High Bill
Imagine sinking your teeth into tender, juicy, fall-off-the-bone ribs, bursting with smoky-sweet flavor. Now, imagine making them yourself, right in your own kitchen, without needing a dedicated smoker, a grill, or the hefty price tag of a restaurant meal. Sound too good to be true? Not anymore. This comprehensive guide will show you how to master the art of oven baked ribs, delivering results that rival your favorite BBQ joint, any day of the week. For too long, the pursuit of truly great ribs has been shrouded in mystery and intimidating equipment. We've been led to believe that only professional pitmasters with elaborate smokers can achieve that perfect tenderness and rich flavor. While traditional smoking certainly has its place, it’s far from the only path to BBQ bliss. Our secret weapon? Your everyday oven. By harnessing its consistent heat and a few simple techniques, you're about to discover the most delicious, tender, and foolproof oven baked ribs you've ever made.Why Oven Baked Ribs Are Your New Go-To
Ordering a rack of ribs at a restaurant is often treated as a special occasion – an indulgence. The anticipation of that tender meat, the sticky fingers, the savory sauce – it’s all part of the experience. However, ribs can be an expensive cut, and let's be honest, it sometimes feels like a gamble. Will they be perfectly cooked, or disappointingly tough? Will they be flavorful, or just greasy? This is where the magic of oven baked ribs comes in, changing the game for home cooks everywhere: * Cost-Effectiveness: Making ribs at home is significantly cheaper than dining out. You get to control the ingredients, quantity, and quality, making a "special treat" an affordable reality any night. * Unmatched Tenderness, Every Time: The slow-roasting method in the oven ensures consistent, even cooking, resulting in ribs that are literally fall-off-the-bone tender. Say goodbye to chewy, tough ribs for good. Many home cooks swear by this method for The Easiest Way to Make Fall-Off-The-Bone Oven Baked Ribs. * Simplicity and Accessibility: No special equipment, no complex setups. If you have an oven, a sheet pan, and some aluminum foil, you have everything you need. This means you can enjoy fantastic ribs all year round, regardless of the weather. * Flavor Control: From your homemade dry rub to your chosen BBQ sauce, you dictate the flavor profile. This allows for endless customization to suit your taste preferences. * Zero Guesswork: Unlike grilling or smoking which can be sensitive to external conditions, oven baking offers a controlled environment, making the process virtually foolproof and the results consistently excellent.Gathering Your Arsenal: Essential Tools & Ingredients for Success
One of the most appealing aspects of this method is the minimal equipment required. You won't need to invest in any bulky, single-purpose kitchen gadgets.Tools You'll Need:
- Standard Oven with a Broiler: The heart of our operation.
- Sheet Pan (Baking or Cookie Sheet): A sturdy pan to hold your ribs.
- Heavy-Duty Aluminum Foil: Crucial for wrapping and creating a moist cooking environment.
- A Sharp Knife and Paper Towels: For membrane removal and slicing.
Key Ingredients:
While the steps are easy, the quality of your ingredients, particularly the ribs and the seasoning, makes all the difference.
- Pork Ribs: For optimal tenderness, we highly recommend Baby Back Ribs (also known as Pork Loin Back Ribs). They are typically meatier and more tender than spare ribs, making them ideal for this slow-roasting method. One slab usually weighs around 2.5 lbs and is perfect for 2-3 people. You can easily adjust the recipe for multiple slabs.
- The Flavorful Dry Rub: This homemade rub is where the magic begins, building a deep, complex flavor profile. We'll use:
- Brown Sugar: Light or dark. Essential for sweetness, moisture retention, and aiding in caramelization during the final broil.
- Kosher Salt & Ground Black Pepper: Your foundational seasonings.
- Onion Powder & Paprika: For aromatic depth and a beautiful reddish hue.
- Ground Dry Mustard: Don't skip this! It adds a subtle tang, helps emulsify and bind the other spices, and its acidity contributes to tenderizing the meat.
- Optional Cayenne Pepper: A pinch will make all the other flavors "pop" without necessarily making the ribs spicy. Adjust to your heat preference.
- Yellow Mustard (as a Binder): This is perhaps the most surprising ingredient for some, but it’s a game-changer. A thin layer of regular yellow mustard applied directly to the ribs acts as a binder, ensuring the dry rub adheres perfectly. Crucially, the vinegar in the mustard also works to further tenderize the pork and amplify the rub's flavors. Rest assured, your ribs will not taste like mustard!
- Your Favorite BBQ Sauce: Whether it's a store-bought brand you love or your own homemade concoction, this will be brushed on at the very end to create that irresistible sticky, caramelized glaze.
Mastering the Art of Oven-Baked Ribs: The Step-by-Step Method
The beauty of this recipe lies in its straightforward process, ensuring tender and delicious results every single time.- Preheat Your Oven to 300°F (150°C): This temperature is key. It allows for slow roasting, breaking down the tough connective tissues in the ribs over several hours, without drying out the meat or requiring an all-day cook like extremely low temperatures.
- Prepare the Ribs – Remove the Membrane: This is a crucial step that many beginners overlook. On the underside or bone-side of the ribs, there's a thin, silverskin-like membrane. If left on, it becomes tough and chewy, preventing the rub and smoke (or oven flavors) from fully penetrating the meat.
To remove it: Start at one narrow end of the slab. Slide a butter knife or the handle of a spoon under the edge of the membrane, working it up until you can get a good grip with your fingers. Use a paper towel to help grip the slippery membrane, then slowly pull it off the entire rack. It should come off in one piece. If it tears, simply find another edge and continue pulling.
- Apply the Binder and Dry Rub:
- First, generously spread a thin layer of yellow mustard all over both sides of the ribs. Don't worry about quantity; just enough to coat.
- Next, liberally sprinkle your prepared dry rub over the mustard-coated ribs. Don't be shy! Gently massage the rub into the meat, ensuring an even coating everywhere. This creates a flavorful crust that will develop during cooking.
- Wrap and Slow Roast:
- Place your seasoned ribs on the sheet pan. Use heavy-duty aluminum foil to create a very tight seal around the ribs. You want to essentially create a foil pouch, trapping all the moisture and steam inside. This is vital for achieving that desirable tender, juicy consistency.
- Place the foil-wrapped ribs into your preheated 300°F oven. Roast for approximately 2.5 to 3 hours for baby back ribs. If you're cooking larger spare ribs, you might need an additional 30-60 minutes. The ribs are done when the meat has significantly pulled back from the ends of the bones, and they are incredibly tender when probed. For a truly Foolproof Oven Baked Ribs: Tender & Delicious Every Single Time, patience is key during this slow roast.
The Grand Finale: Achieving That Perfect Char and Glaze
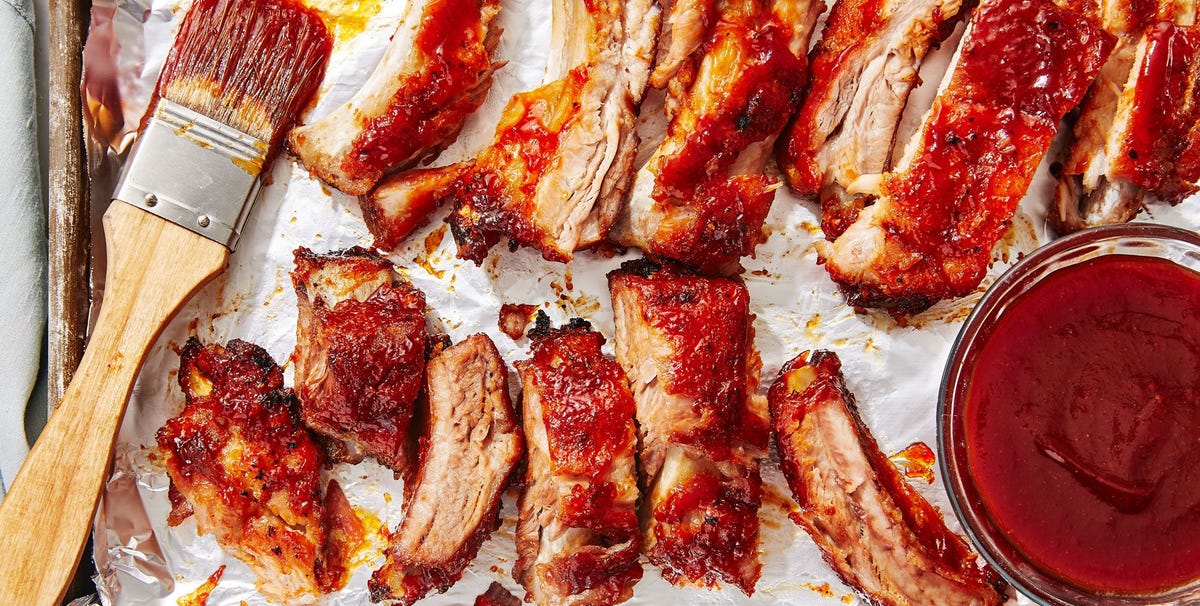
Once your ribs are perfectly tender from their slow roast, it's time for the final, show-stopping act: developing that sticky, caramelized BBQ crust.- Unwrap and Sauce:
- Carefully remove the ribs from the oven. Unwrap the foil, being cautious of the hot steam. You'll likely find a good amount of rendered fat and juices in the foil – you can discard these, or save the juices for a flavorful broth or sauce base.
- Brush a generous layer of your favorite BBQ sauce over the top side of the ribs.
- Broil for Perfection:
- Increase your oven temperature to "broil" (usually high). Place the sauced ribs back into the oven, keeping a very close eye on them. The broiler's intense heat will quickly caramelize the sugars in the BBQ sauce, creating that beautiful, slightly charred, glossy crust.
- This step only takes 5-10 minutes, often less. Turn the sheet pan periodically to ensure even browning. Remove the ribs as soon as the sauce is bubbly and lightly charred – do not walk away, as they can burn quickly!
- Rest, Slice, and Serve:
- Once out of the oven, let the ribs rest for 5-10 minutes. This allows the juices to redistribute, ensuring maximum tenderness and flavor.
- Slice the ribs between the bones and serve immediately.
